Photography Backup Workflow
It’s important for every photographer to have a robust backup workflow and strategy. While failure rates for cards and drives are very low, they’re not zero, and failures do happen.
I never want to be in the position of losing a clients wedding images, be it before I’ve handed over the final images, or after. So I’ve developed a photography backup workflow that works for me without costing a fortune.
The software I use for my backups is a free piece of software called SyncToy it’s a lightweight app developed by Microsoft, and I use it in “Echo” mode. Which means any changes, additions or deletions from the Left Drive, are mirrored to the Right Drive. It’s not instant, you have to run a job to do this. I run the job manually after every import and then the backup runs automatically once a week from then on.
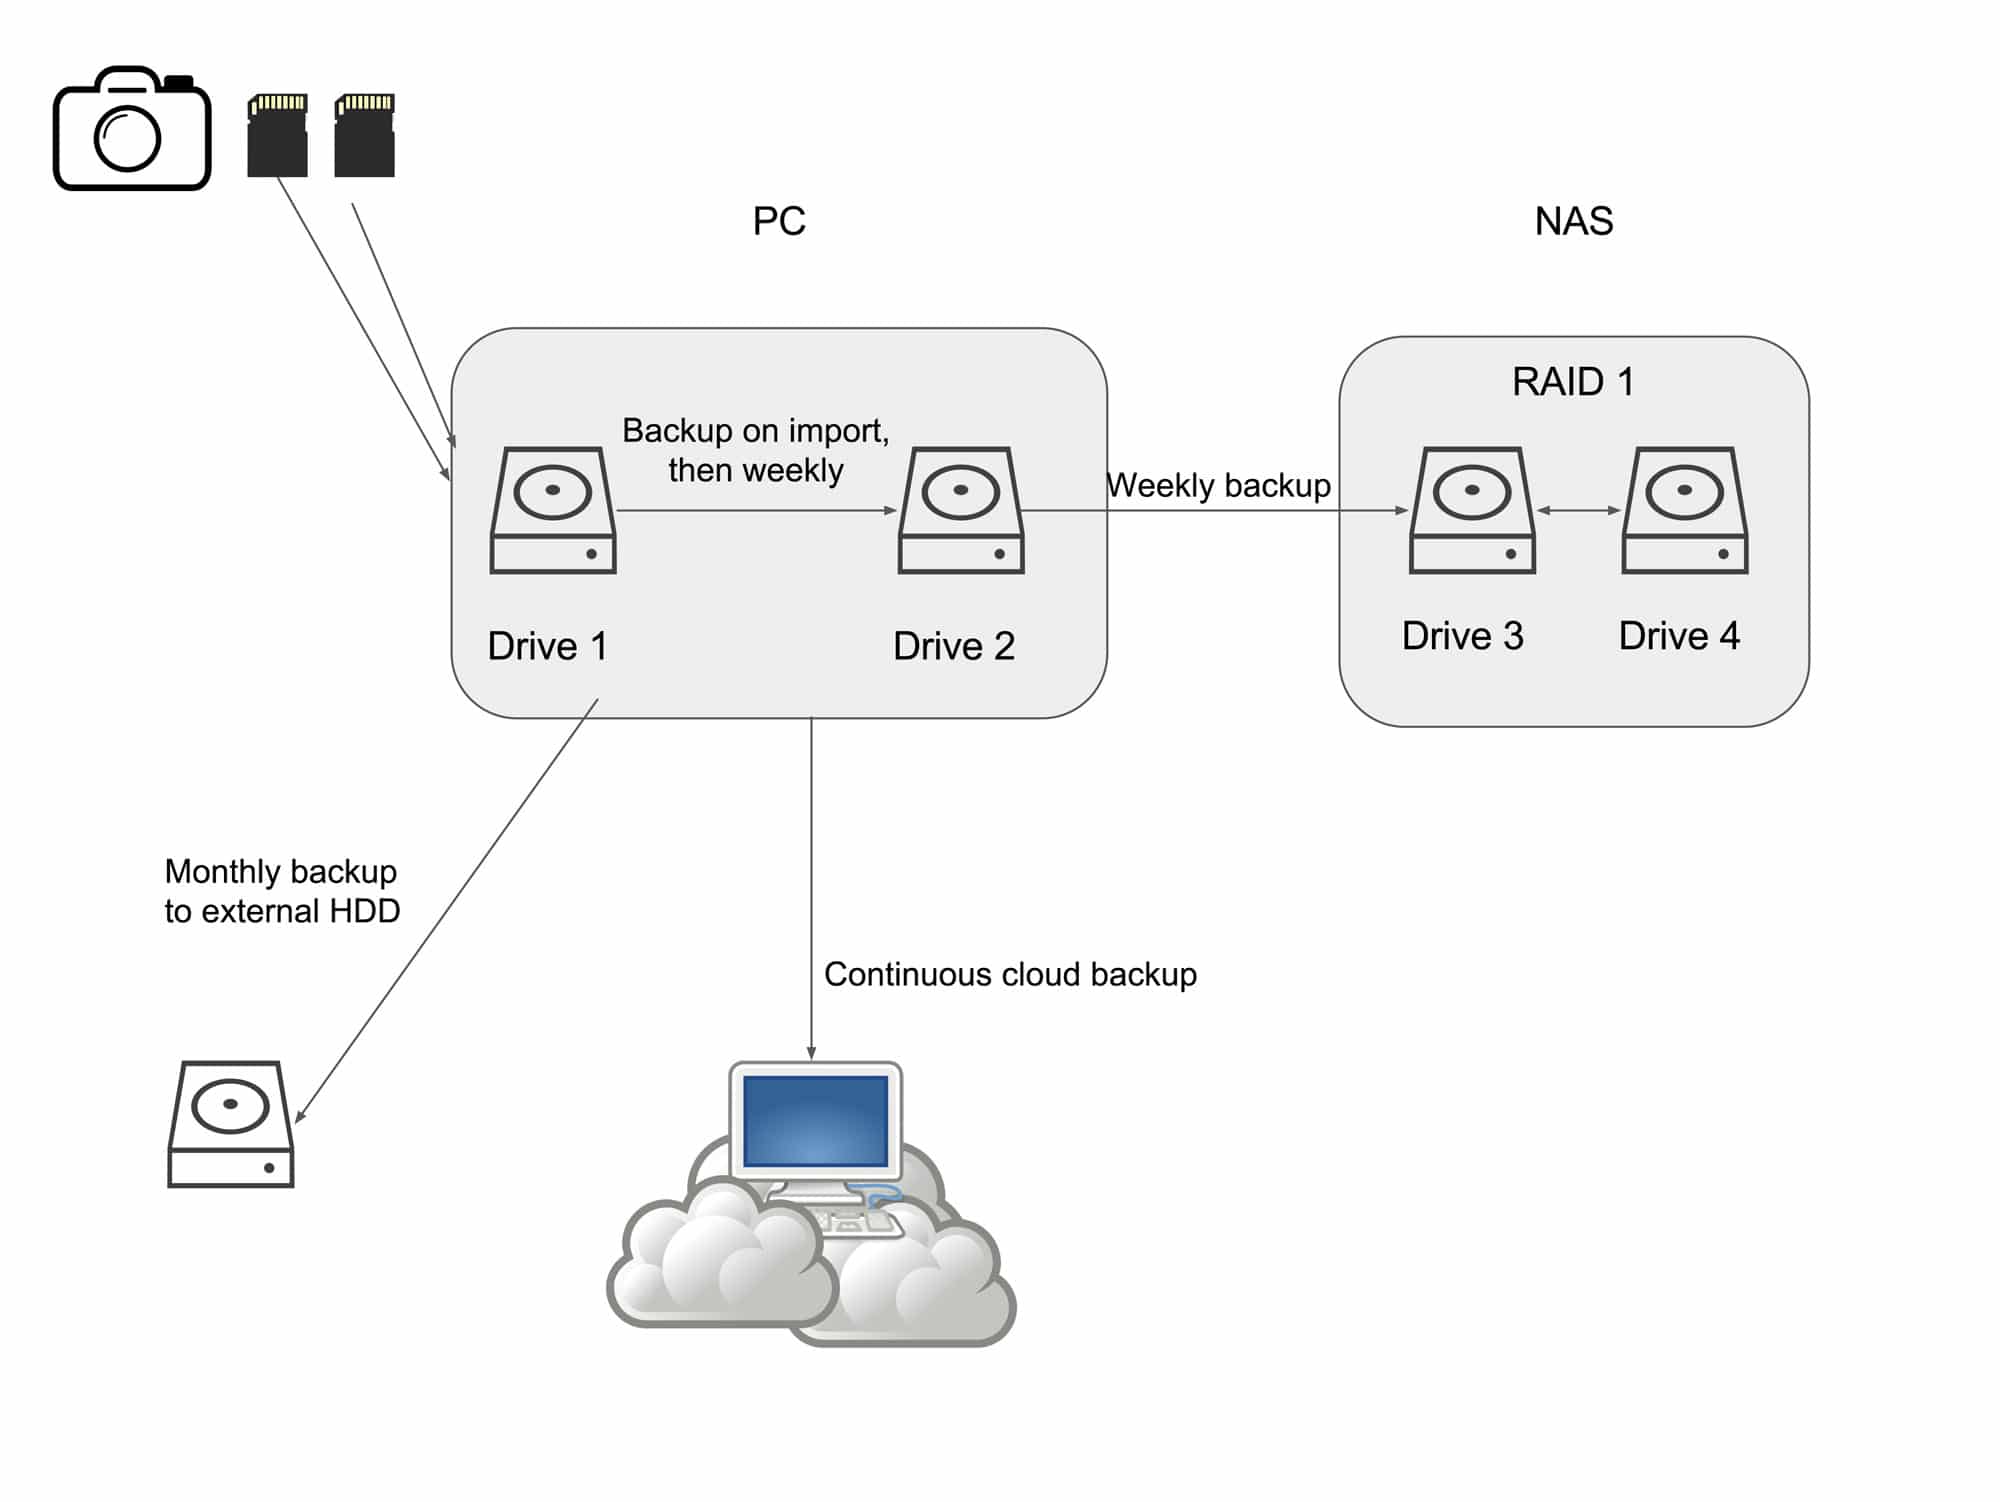
My Photography Backup Workflow – From Camera to Cloud
Firstly, I shoot with a dual card camera. My camera writes the RAW files to both memory cards at the same time, so I’ve got a backup from the moment I press the shutter button. Some people choose to have the backup as JPEG on the second card, but I don’t see the point, if you’re happy with the JPEG, why are you shooting RAW in the first place? If you want RAW, backup RAW.
I import everything via Lightroom, and I have a separate catalogue for every year. Some people create a new catalogue every few months, or every wedding. But I’ve not noticed any improvement to the speed of my lightroom by doing it more often, so once a year works for me. I import the images into my folder structure so for example:
Drive1:\Photography\2017\Weddings\Matt-Holly-Wedding.
This is stored on Drive 1 in the below flowchart (I’ve only included the storage drives on the diagram, windows and lightroom / photoshop run off a separate SSD that doesn’t contain any image files, just the programs I’m going to be using).
I work on a desktop PC, there’s lots of arguments about whether a Mac or a PC are better for editing, and I’m not going to get into that. The best machine to use, is the machine you enjoy using the most.
However, the beauty of any desktop machine is the ability to add extra drives. So my first backup is a second drive within the main PC, it’s the exact same spec as Drive 1. I always use Western Digital Red drives, even if I’m not using them in a RAID array. They have great performance and the stats on their longevity are fantastic.
The only thing on Drive 2, is the backup of my photography folder on Drive 1. I don’t use it for anything else, no exports, no processing, it is just a backup of Drive 1.
I run the backup job manually after I’ve imported images, just using the synctoy command prompt. Hit “Windows + R” and then enter:
“C:\Program Files\SyncToy 2.1\SyncToyCmd.exe -R”
This instructs SyncToy to sync all folder pairs that you’ve set up in it.
The reason I don’t have these drives set up as RAID 1 – Drive Mirroring, is that contrary to popular belief, RAID 1 does not give you a backup. It gives you redundancy this means that it protects you against total drive failure. But, it doesn’t protect you against data corruption. If a file corrupts on one drive, that corruption will be instantly mirrored to the other drive. So a periodic copy to the drive makes much more sense when you’re talking about backup workflows.
My next backup is also handled within SyncToy, the second job runs as soon as the first has finished. This is still on my home network, but not on my PC. I have a 2 bay NAS, a Buffalo LinkStation, again containing two WD Red drives. The same file structure is copied onto this, again using the Echo command on SyncToy. This drive is set up in RAID 1. So everything that gets copied onto Drive 3, is instantly mirrored to Drive 4. I can use RAID safely here, because it’s not my only backup.
So I have protection against Data Corruption on my PC, and between the PC and the NAS, because that’s not instant. And I have redundancy in case of drive failure on the NAS.
These are the only jobs handled by SyncToy, I manually run them on import, and then they’re scheduled to run weekly. If you’re not familiar with using Windows Task Scheduler, then there’s a great walkthrough on howtogeek.
The next stage of my photography backup workflow is an external drive, I do this manually on a monthly basis, again a copy of what’s on Drive 2. Ideally you want this drive stored off-site, to protect against theft or fire at home / work.
And finally, I also have a continuous sync to CrashPlan. As well as using their cloud storage, you can also use their client to do your backup to external drives, but I don’t bother using this, it feels over-engineered to me. Depending on your upload speed, it can take a while to upload to CrashPlan. But it doesn’t really matter, if you follow a backup strategy like mine, then it’s there as a worst-case-scenario backup anyway.
Cloud backup services should always be third-tier backup at least. It’s a backup of a backup to give bullet proof protection. But restoring from the cloud can be painfully slow, so it makes much more sense to have a robust photography backup workflow in your place of work, so the cloud backup is just to protect against total failure.
Any questions, please feel free to ask them in the comments, or if you can see a way I could improve my own backup workflow, then I’m always open to suggestions!
For Laptop and all-in-one / iMac users
The principle is the same, but you may have to rely on multiple external drives or NAS solutions to provide the same level of security. I prefer desktops because it keeps most of it “in the box” but there’s nothing stopping you from having just a backup workflow that is just as robust as this, but using external drives. The important thing is to just make sure you have multiple copies of everything, and for there to be a time gap between some of the updates. Any instant copy such as in a RAID array offers no protection to accidental deletion or data corruption.
Share this backup workflow with others
If you would like to use this image on your own site, then I’m fine with that as long as a link is given back to this page. An embed code is included below if you want to use that. Or feel free to write your own.
If you’re looking for a Norwich Wedding Photographer or Norfolk Wedding Photographer then you may be in the right place. Please see my pricing and portfolio page for more details. For weddings further afield, travel may be charged on top, why not get in touch and see if we click?


wow this is great! thanks for sharing your knowledge and experience! I definitely need to create a robust back up plan.
This is really insightful to see how someone else manages backups! Mines essentially the same without the cloud backup of raws. I just do the jpeg’s. One of the biggest things I’ve been working on recently is just getting that wedding edited as soon as possible and those jpegs out to customers. Less risk then!
A nice setup there Andy. It’s as safe as houses, I’d say.
Super helpful Andy – thanks for taking the time to do this.